Personalizing support is key to building a loyal customer base and boosting sales. But how do you keep track of individual needs and preferences when you’re dealing with dozens, or even hundreds, of people every day?
The answer is to create clear and easily accessible customer profiles. With all the essential information in one place, your support team has the insights they need to offer personalized and effective assistance. This turns routine interactions into opportunities to build relationships and foster brand loyalty.
In this guide, we’ll walk you through how to create user-friendly customer profiles. You’ll need to gather essential data, organize it effectively, and leverage those insights to transform the customer experience.
Ready? Let’s get started!
Step 1: Decide What Information Your Profiles Should Contain
A customer profile is useful because it contains key details about a buyer, collected and organized in a concise fashion. If you don’t have enough information, the profile won’t be very useful. Too much data, and it becomes unwieldly.
So the first step is to decide what details your support agents need to know about each customer. Consider who your buyers are and what they need. This is good time to consult (or create) your target customer summaries, as well as any customer segmentation work you’ve done.
It’s also important to review past interactions and talk to your support team. What do customers need? What do they ask about? What kinds of personalization improves their experience – personalization that’s only possible if your agents know certain details upfront?
To get you started, here are some key elements you’ll probably want included:
- Basic information. The customer’s name, of course, and identifying or demographic details.
- Contact details. Email addresses, phone numbers, social media handles, and other preferred communication channels.
- Customer history. Past interactions, support tickets, and purchase histories.
- Linked companies. If you offer B2B services, you’ll want to associate individual customers with their respective companies.
As you refine your own list, remember that the goal is to create a holistic view of each customer. The information in your profiles should enable your team to deliver exceptional support experiences.
Step 2: Create (or Access) a Customer Profile Template
You probably have a lot of customers. You definitely don’t want to re-build your profiles from scratch for each individual. So you’ll need a template or form that you can easily access and populate as needed.
There are a lot of ways to do this. To really streamline your customer support workflows, though, you’ll want this integrated right into your help desk.
If you’re new to this kind of platform, a help desk is a central command center for all your customer service tasks. Our own help desk, Groove, is designed specifically for the needs of small online businesses.
It’s built to simplify and enhance support – so of course it offers built-in customer profile functionality!
With that in mind, let’s walk through the process of creating and customizing a customer profile in Groove. We’ll set one up for a fictional buyer – Joan from Fragincense.
Groove automatically creates a customer profile whenever someone contacts your support team. These profiles appear in the right sidebar of your Groove inbox.
So to access Joan’s profile, you’ll simply log into your Groove account and open a relevant conversation. Then look for the profile in the right sidebar:
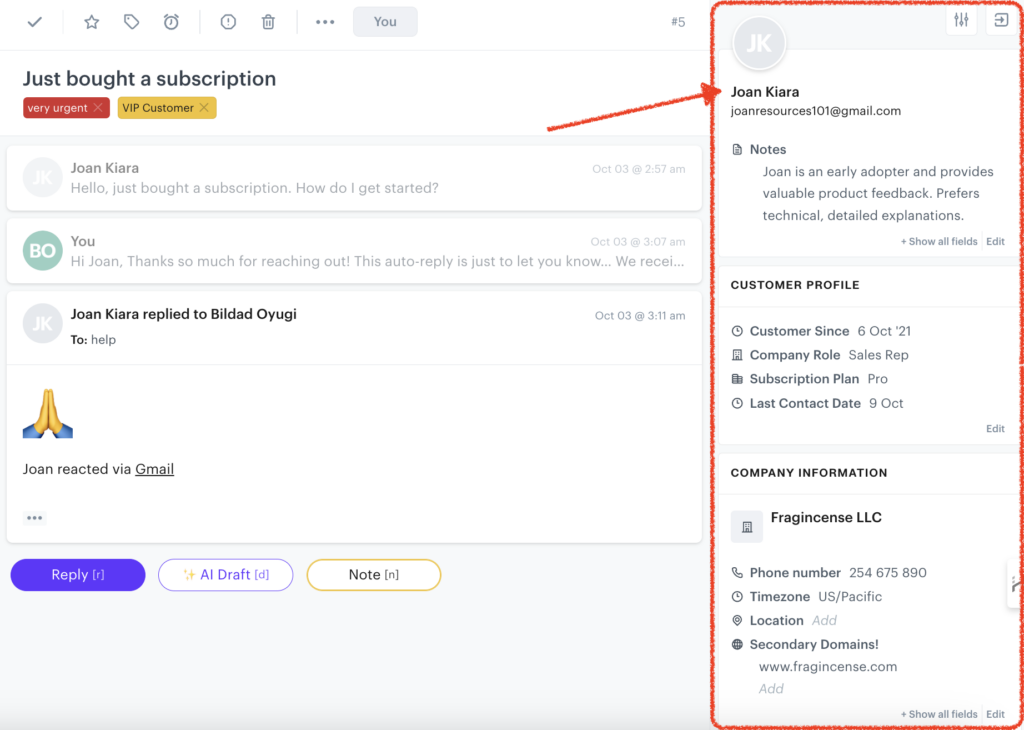
This is a good time to familiarize yourself with the sidebar layout. It’ll be your team’s go-to spot for customer information during support interactions.
Step 3: Customize the Profile Fields
With Groove, your customer profiles will contain some basic information by default. But every business is different, so you can also tailor profiles to your specific needs via custom fields.
To do that, go to Settings > More and select the Custom Fields option. There, you’ll have two choices:
- Adding fields based on existing categories
- Adding fields based on new categories you create
Select Add Field to create new custom fields. For Joan, let’s add:
- Company Role (single line type)
- Subscription Plan (dropdown type with options: Basic, Pro, Enterprise)
- Last Contact Date (date type)
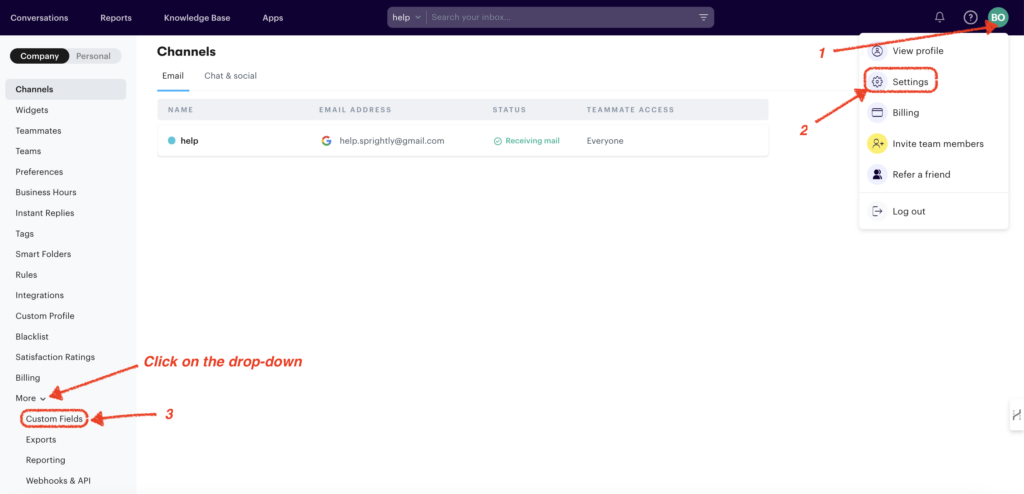
Then we’ll return to Joan’s profile in the conversation sidebar, and fill in the custom fields with her information:
- Company Role = Sales Rep
- Subscription Plan = Pro
- Last Contact Date = 2021-10-06
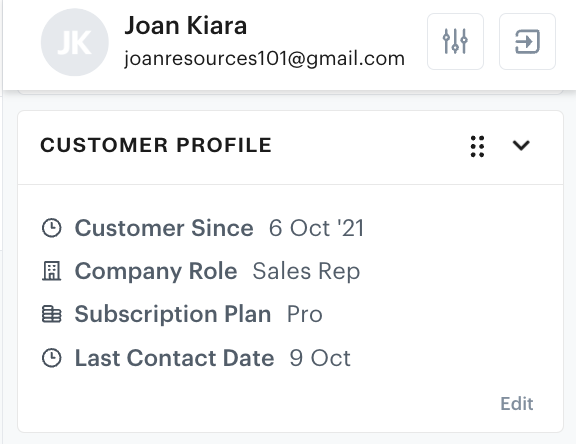
You’ll want to choose fields that provide valuable context for your support team. For more details on using custom fields, check out our documentation on the topic.
Step 4: Use the Notes Section for Additional Context
The Notes section is perfect for additional context that doesn’t fit into custom fields. Is there something about the customer you want to remember during future interactions? Notes give you the ability to write it down for later reference.
You’ll find this option below the customer’s profile photo:
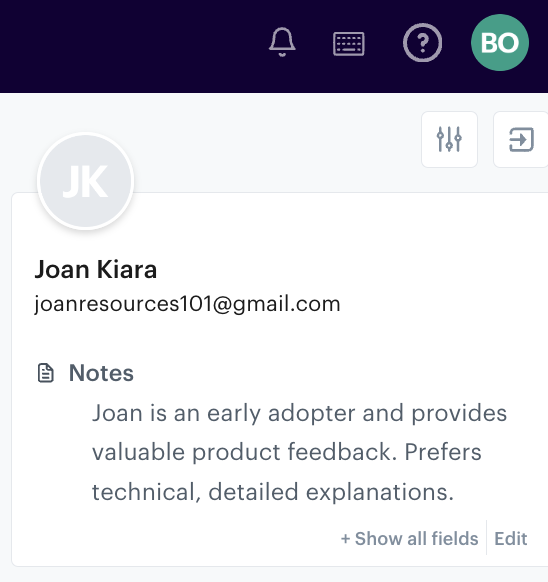
We’ve added a quick summary of what we know about Joan:
“Joan is an early adopter and provides valuable product feedback. Prefers technical, detailed explanations.”
Keep your notes concise and relevant. Focus on information that helps provide better support or identifies opportunities for account growth, but is unique enough not to merit a dedicated custom field.
Groove automatically logs all interactions with your customers. This means you can check previous conversations, and look for patterns in inquiries or communication style preferences. You can use this history to leave better notes, and provide more personalized and context-aware support.
Step 5: Add Tags for Quick Categorization
Tags are a great supplement to your basic customer profiles. They help you quickly identify buyer characteristics and support needs.
To create a tag for Joan, we’ll head over to Apps, click on Tags, and select Create New Tag:
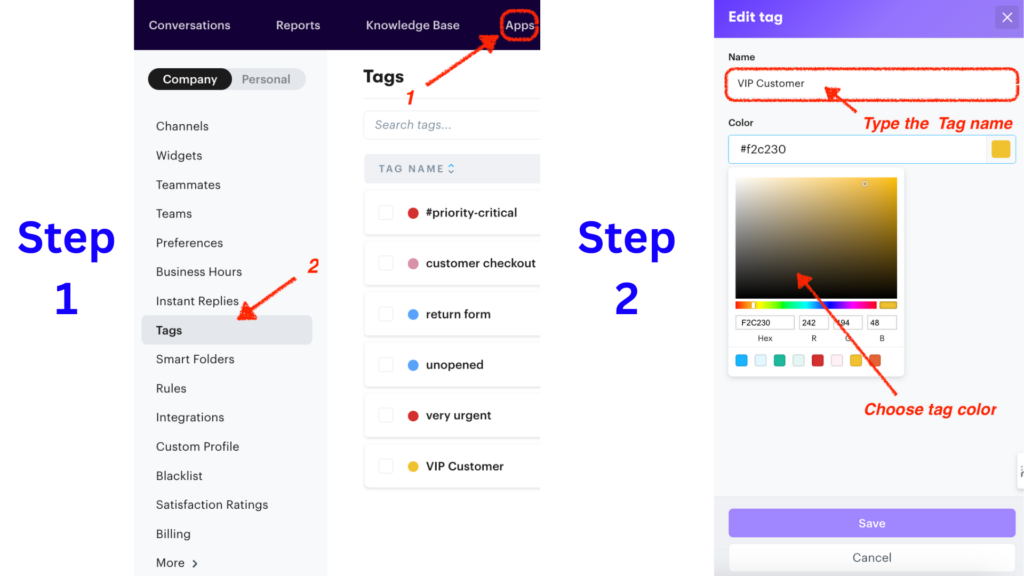
Once you’ve created a tag, you’ll need to attach it to relevant buyers. In this case, we’re going to tag Joan as a “VIP Customer”.
We’ll open a conversation with Joan, and locate the Tag icon. Then we can add relevant tags, such as “top-priority” or “VIP Customer”:
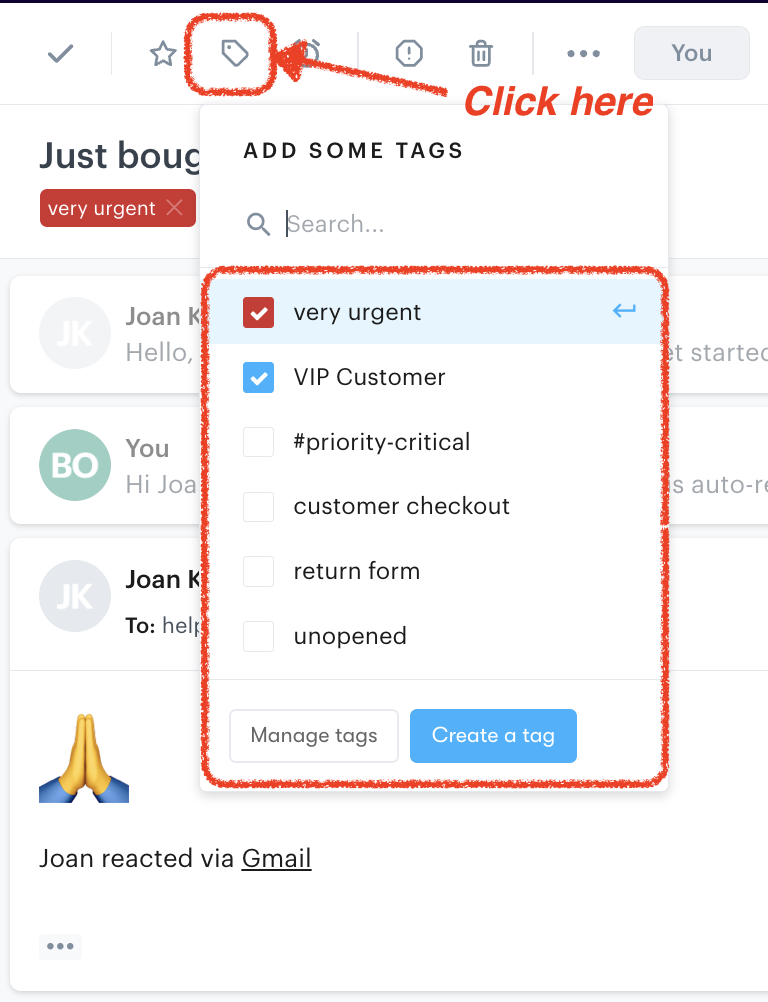
This gives your support team a quick picture of a customer’s key characteristics. Then they can reference the full profile for further details.
It also makes it much easier to locate specific types of buyers – say, if you want to send out a promotion only to high-value customers or those on a certain plan.
Step 6: Link Related Companies (As Needed)
If Joan is associated with a company, you’ll want to record that information. This is especially important if you offer B2B services and are likely to communicate with multiple decision makers within a single organization.
In Joan’s profile, we’ll go to the Company Information section. We’ll link “Fragincense LLC” as her primary company, and add any other relevant associations:
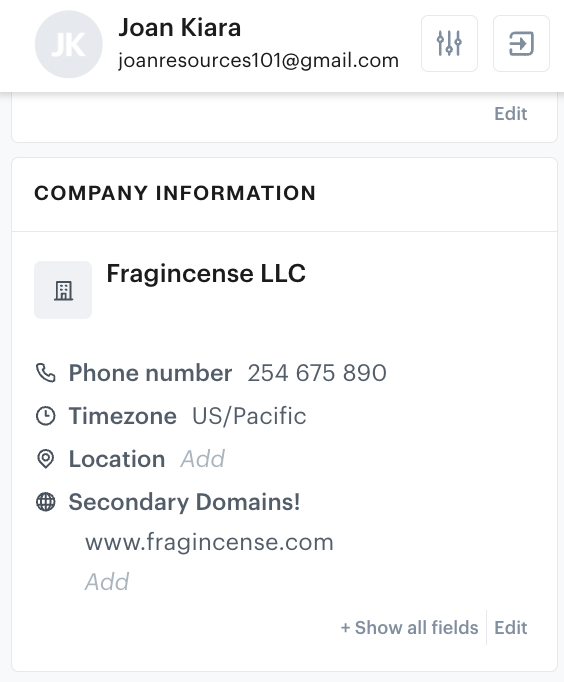
A clear understanding of a customer’s company affiliations reveals broader support or sales opportunities. It also lets you transfer knowledge more easily when your primary contact at a business changes.
How To Use Your Customer Profiles
Once you know how to create customer profiles, the process soon becomes second nature. Now you can use them to improve the quality of your support, without expending extra resources.
To send you on your way, here are our tips for making the most of your customer profiles:
- Personalize support interactions. Customer profiles give your support team instant access to crucial information. They can see past issues, communication preferences, and personal notes.
- For instance, knowing that Joan prefers technical explanations allows your team to skip the basic troubleshooting and get right to the specifics.
- Provide proactive support. Profiles are important for identifying current customers who might need proactive assistance.
- For example, let’s say you notice that a customer has repeatedly contacted support about the same issue. You can reach out proactively with a solution or helpful resource. This anticipates their needs, and shows that you’re attentive to their challenges.
- Leverage targeted marketing and sales. Comprehensive customer profiles inform your customer acquisition efforts. When you understand your customer groups and their needs, you can create more targeted campaigns and personalize your outreach.
- Build customer relationships. Personalized interactions, proactive support, and efficient issue resolution contribute to customer loyalty. When customers feel understood and valued, they’re more likely to become loyal advocates for your brand. This allows you to compete more effectively with larger enterprises.
- Improve your knowledge base. By analyzing multiple customer profiles and identifying common pain points, you can tailor your knowledge base content to address specific needs. This empowers customers to find solutions on their own, reducing support ticket volume.
- Integrate your profiles. Consider integrating with your CRM or other relevant tools to pull in additional customer data.
- Regularly review and update customer profiles. You want to make this a part of your regular support routine, to ensure that information stays fresh and relevant. It’s especially important to update details based on recent interactions and changes in customer status.
Transform Your Customer Support with Groove
Understanding how to create detailed customer profiles empowers your team to deliver personalized, proactive, and empathetic support. With customer preferences, needs, and histories at your fingertips, you can provide top-quality service that drives growth.
Remember that customer profiles are dynamic. Be sure to update them with new insights gleaned from survey feedback, support conversations, and other customer journey touchpoints.
Ready to offer your customers the best your business can provide? Along with user-friendly customer profiles, Groove gives you a centralized inbox for all service interactions, tools to streamline and automate your workflows, and a whole lot more.
Start a free trial of Groove, and get everything you need to turn buyers into fans!


