I rewrote my first knowledge base 10 times before finally publishing it—learn from my wasted time. Here’s a well-thought-out plan (with examples) to get you started.
When I initially set out to create a knowledge base, I Googled “knowledge base examples” and found a bunch of finished products.
Still unsure how to begin, I started drafting articles without any clear sense of where they would go. My lack of forethought left me restructuring and second-guessing every decision.
At one point, I spent hours copying and pasting a handful of individual articles into one larger article. There was no set organization to the knowledge base. Nothing to work towards. Just a ton of information bursting at the seams.
Here’s a guide I wish I had before creating a knowledge base. Using eight of our own knowledge base article examples, we’ll help you move forward in the smartest way possible.
8 Lessons With Knowledge Base Examples to Guide You
A list of good knowledge base examples is helpful. But it’s not a complete thought. To connect the dots, each of our examples begins with a lesson.
Lesson 1: Use Common Questions for Content Ideas
I was paralyzed by the overwhelming amount of potential knowledge base topics. Everything competed for top priority. I had no idea where to start.
In hindsight, my advice is to just start.
Pick one single question (not topic, those are too broad!) to answer first. Start with your most common customer inquiries. If you’re using a help desk, take a look at your canned replies.

Turning canned replies into knowledge base articles offers customers a low-effort self-service option. As opposed to a high-effort email interaction. Plus, you’ll maximize your agents’ time by minimizing the amount of robotic work they need to do.
Even better, you can literally just copy and paste the content. All the important information is already spelled out in your email.
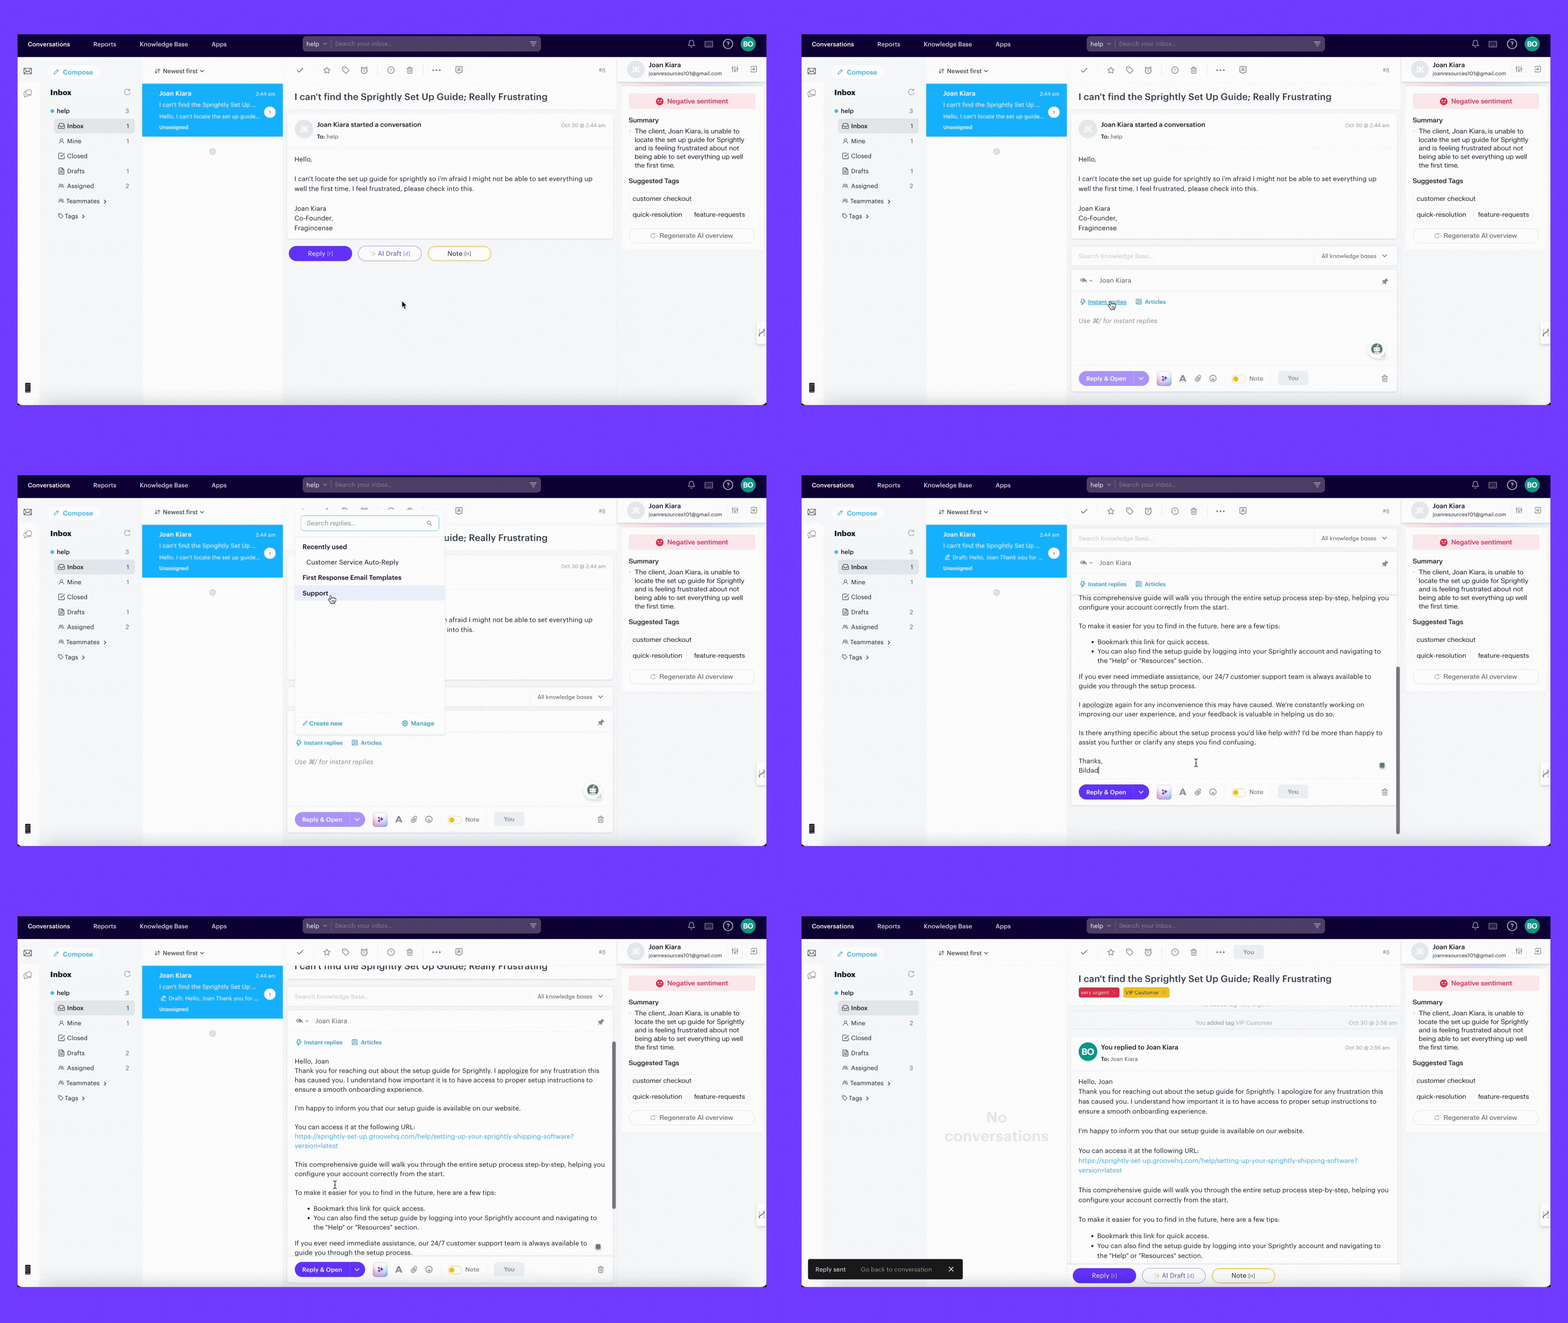
With a few formatting tweaks (keep reading), you’ll quickly turn this email response into a beautiful knowledge base article.
Here’s an example of one of our common questions turned into a knowledge base article here at Groove.
Example 1: Canned Reply Turned Knowledge Base Article
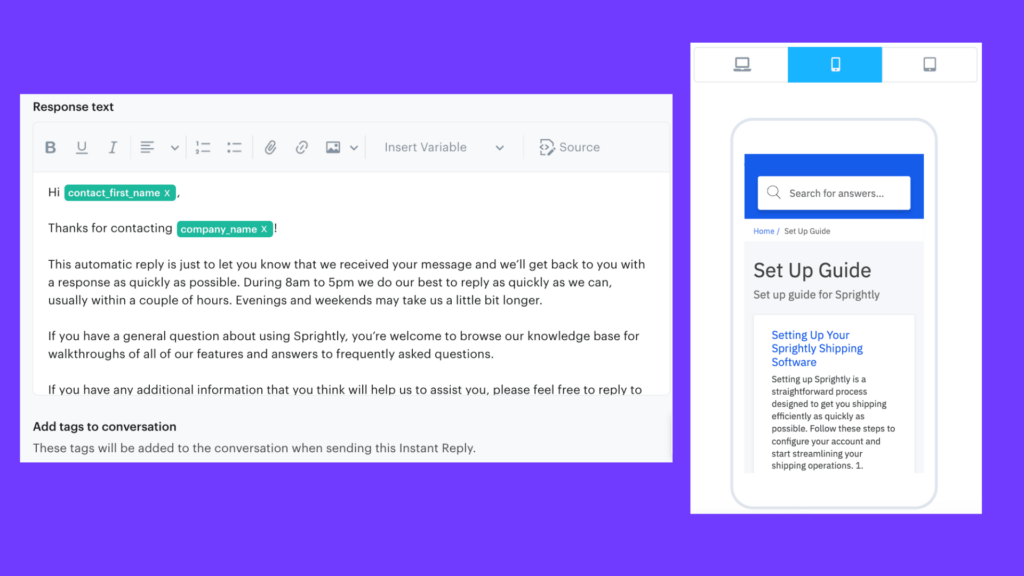
Both the email and the article answer the same question: How do I manage spam?
We break down the answer in a similar format for each medium. Starting with an explanation of how spam gets filtered automatically. Moving into a manual process for marking spam tickets. And ending with a more involved process for manipulating your inbox to reroute spam items.
The knowledge base article simply goes further with each explanation. We add visuals and step-by-step instructions for how to do each of the things we suggest. And we have room to add an additional section on how to find and manage your spam list once you’ve created it.
Same content, different expectations:
- Emails answer specific questions as succinctly as possible.
- Knowledge base articles explain every step of the process, holding your hand as you go.
Lesson 2: Create Titles That Make Sense to Customers
Knowledge base titles shoulder a huge responsibility. They need to clearly explain an entire article in as few words as possible.
Since you’re looking at canned replies anyway, use the inbox to see what words customers already use to describe your products.
Keep your company’s tone and vibe in mind. But frankly, customers appreciate clarity more than creativity in the knowledge base.
At Groove, we use a similar format for most of our titles: verb followed by subject matter.
Example 2: Article Titles Based on Actions or Expectations

This keeps the knowledge base looking consistent and makes it easy for us to name articles in the future.
Thinking about titles in this way ensures you keep article content concise as well. If it takes more than five words to describe what’s in it, it’s likely too much to cover in a single article.
For more general articles, though, we come right out and call it an overview or a guide. It sets up the right expectations and allows customers to easily separate these types of articles from shorter, to-the-point ones.

Lesson 3: Format Articles to Easily Find Answers
Once you cement a title, use it as a north star for actually writing the article. Every sentence should tie back to it. Cut the fat and stay away from tangents.
From my blog writer’s toolkit, here are some ways to make things easy to read:
- Use bullet points (Omg, we’re doing this right now…)
- Use numbers (and this!)
- Use visuals (pictures, graphs, videos)
- Break up blocks of text (a good rule is to limit paragraphs to 3-5 lines)
- Use subheadings
- Include summaries or wrap-ups
- Use bold, italics, underline
Here’s a knowledge base example of all these things in the wild:
Example 3: Super Scannable Content

Lesson 4: Add Images as if Your Life Depended on It
There’s a reason that when you search for “knowledge base examples” you expect to see a slideshow of pictures. When we think of tangible, easy to understand, and quick advice, we think of images.
I like to explain a concept or action using words first. Then I’ll include an image to drive the point home. Like so:
Example 4: Screenshots With Context

The best images are also the easiest to come by … screenshots!
Most of the time, screenshots tell the full story without needing any adjustment. But, when needed, you can easily add arrows or highlight certain elements to clarify.
(knowledge base example 4 of an arrow added to a screenshot)
Between you and me, don’t spend too much time beautifying these images. Most people come to your knowledge base for quick, clear answers. Pictures provide that even if they’re poor quality.
I once did something like this in an image because I didn’t know how to use a pre-formatted circle. And honestly people still knew what I was trying to say.

I caution you here because design is time-consuming. Your ultimate goal is to get this knowledge base up and running. If you feel obligated to perfect every image, you’ll never get this thing off the ground.
Take simple screenshots and put them in the right place throughout the article. As long as you show customers what button to press or which window to open, they’ll be fine.
Lesson 5: Add Videos but Assume No One Will Watch Them
People get real excited about video. But when was the last time you stopped to watch a video from a business? Or turned on the sound on an Instagram video? I’m just saying … it’s not as effective as everyone thinks.
So my advice is to add videos:
- if you have more than enough bandwidth to create them,
- as an added bonus but in no way crucial to the article,
- as an overview of the entire article or
- as a quick how-to for one very specific action.
Here’s an example of how we use them in the Groove knowledge base:
Example 5: Optional Overview Video

The video acts as a stand-alone item and overview of the following content. Essentially, you can either take a minute to watch the video, or take a minute to read the article. The end result will be the same. You’ll know how to create a conversation in Groove.
We don’t use auto-play—some people really really hate auto-play. And, the golden rule I’ve learned working with customers is: Don’t force anything upon them.
For customers who prefer video, though, they’ve got the option to watch it. However, those who don’t can just keep scrolling.
Lesson 6: Brainstorm Related Articles Using Different Customer Journeys
“Related articles” typically lie at the bottom of each knowledge base article. They allow you to serve up the next course without customers needing to ask for it. It’s a great way to minimize customer effort.

As a knowledge base writer, leverage these related articles to touch base with the customer journey. Think about how the customer got to this article and where they’ll want to go next.
Not only will this help you come up with more content and place it in a logical way, but it’ll also cut down on that overwhelming abyss of articles. You can pause at a stopping point for one topic, knowing that you can add another article for the next step.
In Groove’s knowledge base, we use each related article to explore different customer perspectives. We can offer a new article based on their familiarity with our product or their role in their company.
Here’s an example to clarify:
Example 6: Related Articles for Different Journeys

Lesson 7: Organize Based on the Customer Experience
Organizing my knowledge base was easily the most time-consuming part of this whole process. If you’re like me, you’ll intend to organize it chronologically, only to realize that doesn’t make sense down the line. You’ll group things into buckets, only to realize those buckets are too big or too small.
Don’t get bogged down in the organization at first (or you’ll never move forward). Start by writing the articles, then categorize them later.
Once you have a few articles written (from your common questions), organize them based on the customer experience. Think about a users’ journey and what questions they’ll have along the way.
Make it easy for newcomers to find information and for veterans to find answers to more complicated questions. A lot of topics will compete for top billing. But if you focus on a structure that makes sense to your customers for your product or service, you’ll be on the right track.
At Groove, we start with new user basics. As you scroll down, you get to more complex topics.
Example 7: Knowledge Base Categories Based on Customer Experience

Step back and consider your knowledge base organization in relation to the entire customer journey. Use this insight to enlighten and improve all customer communications—onboarding emails, product tooltips, marketing materials.
Lesson 8: Mine Failed Searches for Improvements
This whole process culminates in you staring dead-eyed into the face of all your failures. If your knowledge base software is worth its cake, it will not only have a search bar, but also smart reporting that tells you what people searched for that failed.
This is exactly what the people who come to your knowledge base want to know. So you should give it to them.
Here’s an example of that in Groove:
Example 8: Failed Searches That Will Soon Become New Articles

Tada! More article ideas. Or at least, more pressing article ideas.
If these are topics you’ve already covered in your knowledge base … then go back a few steps and adjust your titles!
It’ll be the easiest improvement you make all day. And it will save you tons of failed searches.
Knowledge is such power in the knowledge base. View your stats and see what’s working to adjust and add new articles on a weekly basis.
How to Build Your Knowledge Base
Finally, let’s look at how you can build your knowledge base. At Groove, we’ve made it pretty straight forward. You just need to;
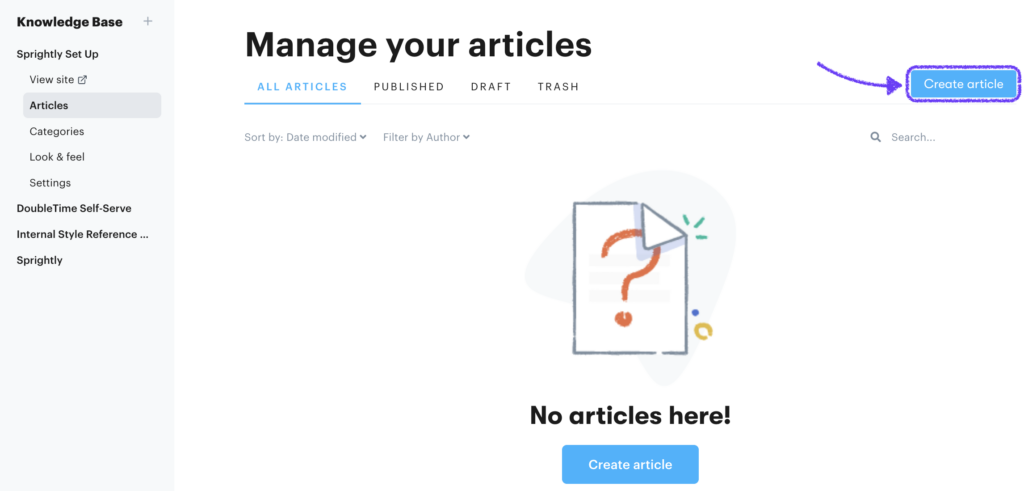
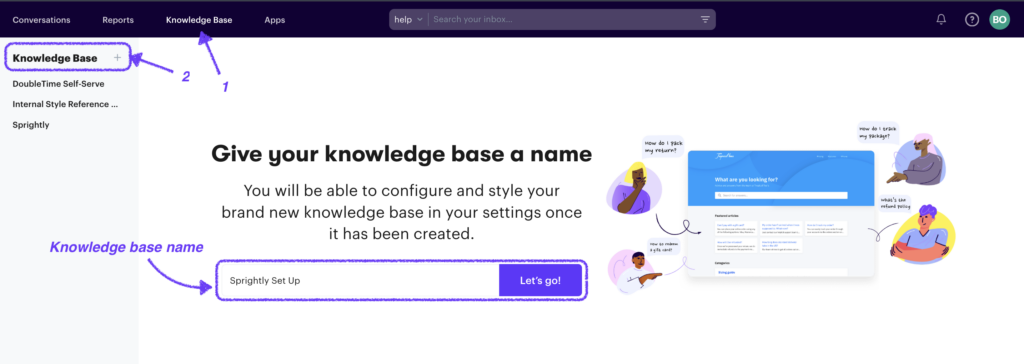
Click on Knowledge Base
Head over to the sidebar menu on the left and click on the “+” sign next to Knowledge Base
Then enter your knowledge base name. For example, that could be “Sprightly Set Up“
Then click on Create an Article
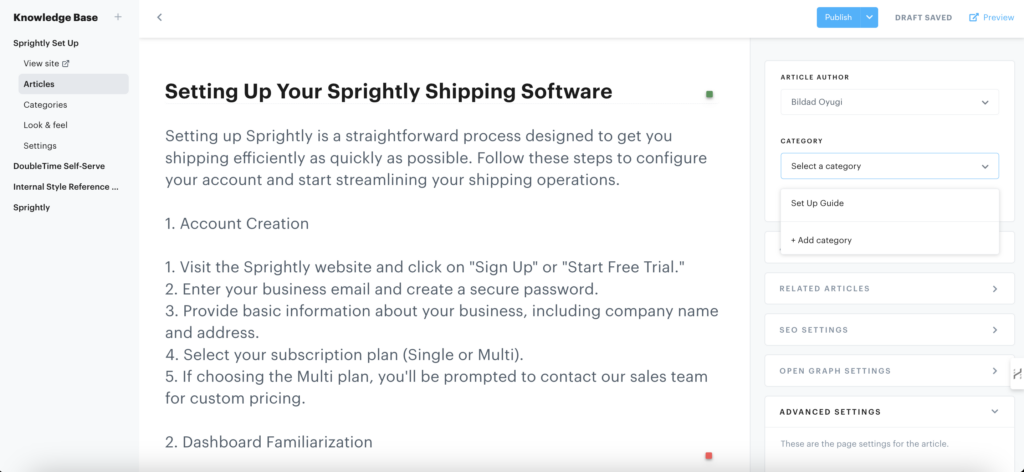
Once you are done, click on Publish. Easy, right?
Well, there’s more that you can do with Groove, our help desk software.
For instance, you can cut down on response times and improve customer satisfaction.
Ready to take your customer support to the next level with help desk software that just works? Get started with Groove today, one of the best customer support tools for small businesses.
Take advantage of our 7-day free trial today for a great customer experience!


